How to wrap a katana handle? A Step by Step guide for Katana Handle Wrapping
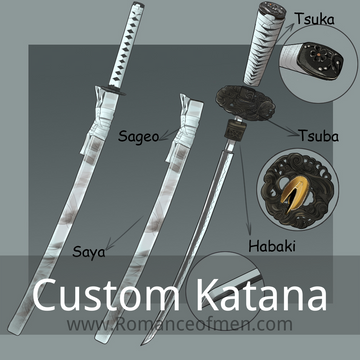
The katana, a symbol of the samurai's soul, has attractive countless enthusiasts and historians around the world with its sleek design and legendary sharpness. Even you are buying the katana for decoration, it’s difficult to resist the desire of actually using it. Whether you just use the katana for light cutting in your backyard, or you are a serious kenjutsu practitioner, Handle (Tsuka) is the part of a katana that you will be in contact with the most.
Having a tight and secure handle is vital to any katana user. One of the most important thing that contribute to the functionality and aesthetics of the handle is the wrapping, called "柄巻" Tsukamaki. Handle wrapping might seen easy at first glance, but it’s difficult and very time consuming to achieve a tight and even tsukamaki.
In Japan, the craftsmen that specialized in this are called Tsukamaki shi “柄巻師”, to become a professional Tsukamaki shi requires years of practice. For us normal katana enthusiasts, mastering the art of tsukamaki may not be necessary. However, learning the basics can be an enjoyable experience, deepening our connection with our swords and giving us a sense of accomplishment. So, let's explore the steps of tsukamaki together.
Table of Content
1- Preparation
If you're new to wrapping the handle of a sword, here's a straightforward guide to help you prepare for the process.
Materials Needed:
- Handle stand or chest (for securing the handle)
- Hishigami (diamond paper) or filler paper (newspaper or Japanese paper)
- Tsukaito (handle wrap thread), preferably cotton or silk
- Ray skin "Samegawa" (if applicable) and any necessary cleaning tools
- File or sandpaper (for smoothing the handle if necessary)
- Ruler or measuring tape
- Scissors or a sharp knife
- Double-sided tape (optional, for beginners)
Steps for Preparation:
Secure the Handle: If you have a handle stand or chest, use it to secure the handle firmly in place. If you don't have one, find a way to stabilize the handle while you work.
Clean and Smooth the Handle: If you're rewrapping, clean any dirt off the ray skin or handle. If the skin's edges protrude beyond the handle, gently file them down for a smooth fit.
Measure and Mark the Handle: Use a ruler to determine the width of the hishigami or the thread you'll be using. Mark the handle to guide your wrapping, ensuring even spacing and alignment.
Prepare the Hishigami: If using newspaper, roll and soften it by hand. Wrap it around itself to create a strip about 1 cm in height, then cut it into 15 mm wide strips. Fold these strips into triangles. You'll need four times the number of diamonds you plan to create on the handle.
Prepare the Tsukaito: Measure and cut the tsukaito to the appropriate length—typically twice the length of the handle. Choose a color and material that suits your preference and the sword's aesthetics.
Optional - Double-Sided Tape: For beginners, applying a strip of double-sided tape along the top and edge of the handle can help keep the tsukaito in place as you wrap. This can be especially helpful if you're working without a stand.
Practice: Before starting on the actual handle, practice wrapping techniques on a similar-sized object to get a feel for the tension and technique required.
Remember, patience and practice are key to mastering handle wrapping. Don't rush the process, and pay attention to the tension and alignment of your wrapping to achieve a professional and functional result.
Step-by-Step Guide to Wrapping a Katana Handle
*Back Side裏側

Step 1: Check the Thread
Before you start, identify the front and back sides of the handle.
Step 2: Position the Thread
Fold the tsukaito to find the halfway point. Align this point with the fuchi on the handle's front side, similar to the positioning shown in the reference photo.
Step 3: Set the Thread Orientation
Orient the thread so it faces the handle's spine (Mune) side. Ensure the left end's weave is facing upwards when you set it on the edge metal.
Step 4: Flip the Handle
While holding both ends of the tsukaito, flip the handle over to prepare for wrapping.
Step 5: Determine the Starting Side
If the number of diamond settings is even, start twisting from the right side. If it's odd, begin on the left side. For this example, with 14 diamonds (even), start from the upper/right side.
Step 6: Begin Wrapping
Start twisting inward. Place a triangular piece of diamond paper under the tsukaito and wrap it inward, as illustrated in the upper photo.
Step 7: Continue Wrapping
Follow the twisting method shown in the lower photo, ensuring you maintain the direction and tightness.
Step 8: Add Diamond Paper on the Opposite Side
Position another piece of diamond paper inside the tsukaito on the handle's opposite side.
Step 9: Wrap the Bottom Thread
Envelop the diamond paper with the bottom thread by twisting it, as shown in the subsequent photo.
Step 10: Finalize the Wrap
Continue the twisting and wrapping process, ensuring the diamond paper is fully enveloped. After wrapping, pull the tsukaito to tighten it.
Step 11: Complete the First Twist Wrap
Once the wrap is tight and the pattern is consistent, you've finished the initial twist wrap on the back side.
* Front Side 表側
Step 1: Turn the Handle (表側)
After completing the backside diamond wrap, flip the handle to have the front side facing upwards.
Step 2: Switch Thread Roles
The thread that was on top while wrapping the back side becomes the bottom thread for the front side. Place a piece of diamond paper under this bottom thread.
Step 3: Wrap the Bottom Thread
Similar to the back side, sandwich the diamond paper with the bottom thread and twist it inward. Follow the twisting as shown in the provided photo.
Step 4: Add Diamond Paper to the Top Thread
Once the bottom thread twist is complete, place a piece of diamond paper on the top side as demonstrated in the photo.
Step 5: Wrap the Top Thread
Wrap the top thread (previously the upper thread on the back side) over the diamond paper, ensuring it envelops the paper as you twist. Continue to form the diamond shape.
Step 6: Align the Wrapping
As you wrap, adjust the tsukaito to ensure it aligns with the pre-marked diamond setting lines.
Step 7: Continue Wrapping
Keep wrapping in the same manner, ensuring that the overlaps alternate between top and bottom. Tighten the tsukaito as you go along.
Step 8: Place the Menuki
Insert the menuki at the fifth diamond. Depending on the grip or design preference, placing it at the third diamond is also acceptable. Ensure the correct orientation of the menuki.
Step 9: Add Diamond Paper Over Menuki
If the menuki's height requires adjustment, add extra diamond paper to ensure the wrap's tightness and consistency.
Step 10: Finish the Wrapping
After adjusting for the menuki, continue wrapping until you reach the handle's end, following the same procedure. The final step involves securing the end of the tsukaito.
Back Side Knot:

Flip the Handle: After wrapping up to the handle's head, turn the handle over to start securing the tsukaito on the back side.
Start with the Top Thread: Begin with the thread that was on top while wrapping the front side, now on the back, and add a piece of diamond paper underneath.
Thread through the Diamond: Use a needle to pass the thread from the top of the diamond to the bottom, as demonstrated in the photo.
Tighten the Thread: Pull and tighten the thread after threading it through to the bottom.
Pass and Tighten the Other End: Thread the other end of the tsukaito through the bottom of the diamond, tighten it while adding diamond paper.
Secure the Top Side of the Diamond: Pass the tightened thread underneath the top side of the diamond using a needle.
Tighten the Thread Again: Ensure the thread is sufficiently tightened.
Final Adjustment: Pinch and roll the thread for a tight and neat finish.
Thread through the Kashira: Fold the threads in half and pass them through the Kashira's hole.
Adjust the Diamonds: Make any necessary adjustments to ensure the diamonds are even and secure.
Front Side Knot
Flip the Handle to the Front: Turn the handle over to start securing the front side.
Thread Under the Diamond: Take the thread that was threaded through the Kashira on the back side and pass it under the diamond on the front.
Wrap and Thread: Wrap and pass the threaded end from the top to the bottom of the next diamond.
Tighten the Tsukaito: Ensure the tsukaito is pinched and tightened after wrapping.
Thread the Other End: Pass the opposite end of the tsukaito under the diamond.
Fold and Pinch: After threading, fold and pinch the tsukaito on top of the already wrapped thread.
Thread through the Bottom: Continue to pass this thread under the diamond and tighten.
Wrap around the Kashira: Bring the tsukaito over the Kashira and thread it under the next diamond.
Tighten and Trim Excess: After passing the tsukaito through, tighten it and trim any excess thread as close as possible.
Conceal the Ends: Tuck the visible cut ends into the diamond using tweezers to hide them and ensure a neat finish.
Here we are, all the steps for katana handle wrapping. This is just one common wrapping methods, there are many different wrapping styles, for different kinds of katana, serve practical or aesthetic purpose.
Whether for fun or practice, the patience and skill used through this process enrich our appreciation for this ancient art. Here's to your journey in tsukamaki—may it bring you closer to the spirit of the samurai and make your katana truly your own. Happy wrapping!
