


How Was the Katana Made? Traditional Katana Making Process Explained
Nowadays, you can build your own katana sword, customizing them according to your taste and requirement online. But things were not that easy in ancient Japan, or if you want your katana to be made 100% traditionally.

Table of Content:
The traditional katana making involves many detailed steps. First, the material called "玉鋼" (tamahagane) is selected based on its hardness through processes like "水減し" (mizuheshi, water reduction) and "小割り" (kowari, small splitting). After selecting the best tamahagane, it is refined through "折り返し鍛錬" (orikaeshi tanren, folding and forging). The sword's shape is then formed through "素延べ" (sunobe) and "火造り" (hizukuri, fire forging). The next step is "焼き入れ" (yakiire, quenching), which determines the blade’s "刃文" (hamon, temper line) and the sword’s curvature. Finally, in "鍛冶押" (kajioshi, finishing), the swordsmith inscribes their name during the "銘切り" (mekiri, inscription) process. Here we will give a detailed introduction to each steps:
Tamahagane - The traditional material of Katana
The most traditional and famous material for making Katana is “tamahagane 玉鋼,” it literally means “Jade Steel” in English.
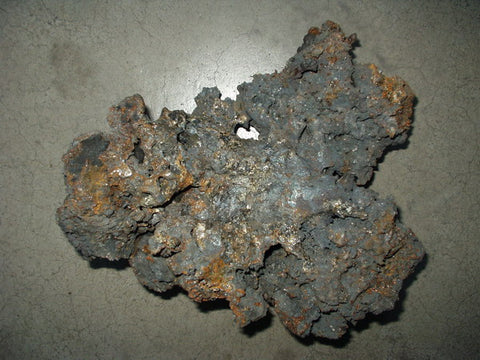
Tamahagane was made through the "tatara" smelting method. This process uses iron sand, a clay furnace, and "fueigo" (bellows) to adjust the carbon content in the iron. Although the technique was once lost in the Taisho period, it was revived before WWII and is now preserved by the "Nittoho Tatara" in Shimane Prefecture. This method produces the high-quality steel needed for sword-making.
Another essential material is charcoal, used during the "yakiire" (quenching) process. The charcoal must be cut evenly in a process called "sumikiri." If the charcoal is too large or small, the "yakibatsuchi" (clay applied to create the temper line) can fall off during quenching, ruining the blade's hamon. Properly cut charcoal ensures the yakibatsuchi stays in place.
Katana Forging Process
1. Water Breaking and Splitting (Mizuheshi 水減)
The selected tamahagane is heated and hammered into a thin sheet approximately 5mm thick. This sheet is then cut into small squares, about 2–2.5 cm wide. The best pieces are selected to continue the process.
2. Layering and Boiling (Tsumiwakashi 積沸)
These smaller pieces are stacked and placed into the forge (hodo) to heat. Through intense heating, known as Tsumiwakashi, the pieces of steel fuse into a single mass.
3. Forging and Creation of Kawagane (Outer Steel)
Once fused, the steel undergoes the process of tanren 鍛錬 (forging), where it is hammered and folded repeatedly, typically around 15 times. This creates kawagane 皮鉄, the hard outer steel, which becomes multilayered, resulting in approximately 33,000 layers.
4. Shingane 心鉄 (Core Steel) Production and Assembly
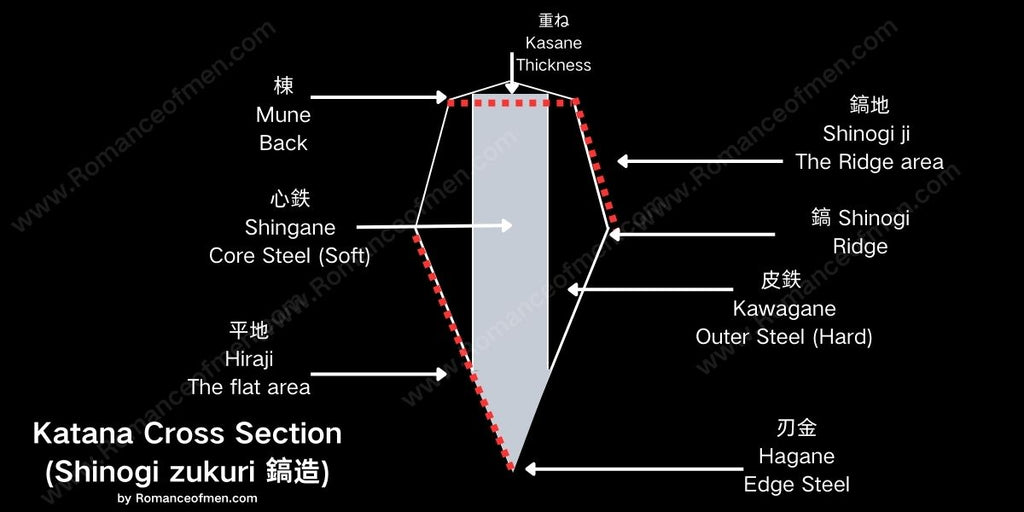
The katana blade achieves both hardness and flexibility by combining soft shingane (core steel) with hard kawagane (outer steel). The shingane, which has a lower carbon content, is wrapped in the tougher kawagane. This wrapping can be done using various methods such as kobuse 甲伏 (side-wrap), honsanmai 本三枚 (three-piece), or shihozume 四方詰 (four-sided wrap), depending on the swordsmith’s tradition.

Shaping and Refinement
1. Preliminary Forging (Sunobe 素延)
After the kawagane and shingane have been combined, the swordsmith heats the material and hammers it into a long, flat bar shape, in a process called sunobe. This stage prepares the blade for shaping.
2. Shaping the Blade (Hizukuri 火造)
Using a small mallet (kozuchi), the swordsmith hammers the blade into its final shape, following traditional guidelines. The blade’s thickness and overall structure are further refined with a coarse file (sensuki-yasuri), completing the shaping process known as hizukuri.
Katana Heat Treatment
1. Clay Application (Tsuchioki 土置)
Before heat treatment, a special clay mixture (yakibatsuchi) made from fire-resistant clay, finely powdered charcoal, and ground whetstone is applied to the blade. The areas where the blade will be hardened are coated thinly, while other areas are coated more thickly. This preparation determines the blade’s hamon (temper line).
2. Quenching (Yakiire焼き入)
The blade is heated to approximately 800°C and then quenched rapidly in water. This process, known as yakiire, hardens the edge of the blade while keeping other areas more flexible, ensuring the blade’s durability and sharpness. This process is also known as differential harden, or clay tempered.

Finalization
1. Straightening and Rough Polishing (Narashi to Aratogi)
After quenching, the blade may have slight bends or warps, which are corrected. The sword is then rough polished (aratogi) to refine its shape and ensure there are no flaws or cracks.
2. Mei-kiri (Inscribing the Maker’s Signature)
Once the blade passes inspection, the tang (nakago) is filed, and a hole for the mekugi (peg) is drilled. The swordsmith then engraves their signature (mei) on the tang, marking the blade as their work.
3. Verification of Blade Quality (Kenshū)
The final step is a thorough inspection of the blade to ensure it meets the high standards of sharpness, strength, and flexibility that define a well-crafted katana. The entire process results in a sword that embodies the traditional philosophy of "unbreakable, unbendable, and sharp."


