


Katana Mekugi tiny wooden pegs that hold your samurai sword together
Complete guide to understand Mekugi 目釘
When it comes to traditional Japanese swords, the Mekugi is a small but crucial component. It's practically impossible to overstate the significance of the Mekugi in Japanese sword construction. Without it, the handle would be loose, and the Katana would be unusable in battle. Curious to know a bit more about Mekugi? Continue reading to understand better its functionality, materials, a brief history, the methods for its removal and more.
Table of Content
- What Is Mekugi (目釘)?
- Common Material for Mekugi
- Do all katanas have Mekugi?
- How to remove and insert Mekugi
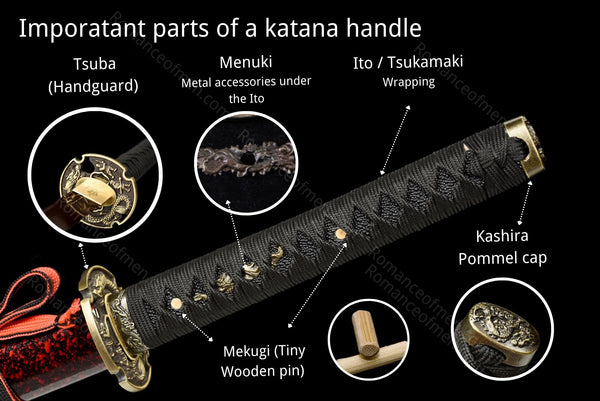
What Is Mekugi (目釘)?
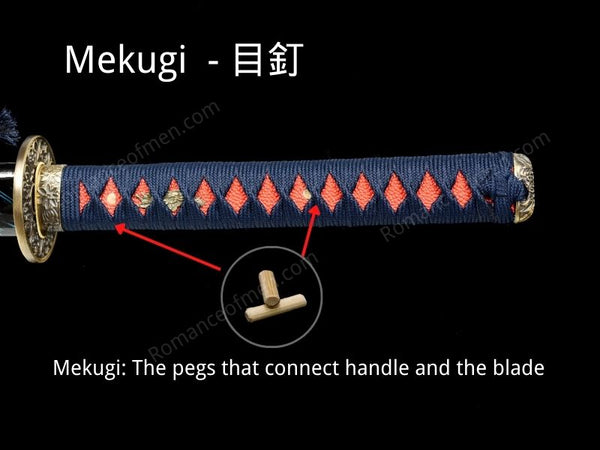
A "Mekugi" 目釘 is a small, rod shaped peg that goes through a hole in the katana's tang (nakago), fastening the Tsuka to the blade. The Nakago has one or more holes (目釘孔 Mekugi-ana) drilled through it, as well as the wooden tsuka, Mekugi is inserted through aligned holes in both the Tsuka and Nakago and secure them together.

The materials for Mekugi are typically bamboo or wood, and a bit of lacquer keeps it in place. Usually there are two Mekugi in a katana, and they are removable and replaceable when you need to disassemble the sword.
Common Material for Mekugi

Image source : aucfan.com
The Mekugi acts as a fastener for a Katana. It allows the swordmaster to use the sword with great force without worry about the handle coming loose, this is very important in battle field. So the material for Mekugi must be strong and flexible enough to absorb impacts.
Metal
In ancient Japan, iron or brass were used as Mekugi material. But it was soon replaced by bamboo for several reasons. First, metal is more likely to cause wear and tear on the tang (nakago) of the sword due to its hardness, which can lead to the loosening of the sword's fit over time. Additionally, metal can be deformed under the force of impact, meaning it can bend or change shape, potentially causing the sword to become loose or the Mekugi to become stuck and difficult to remove for maintenance. Unlike bamboo, metal can also corrode or rust, especially under conditions of high humidity or contact with moisture, which can weaken its structural integrity and further risk the secure fitting of the sword components. Finally, metal does not have the same level of shock absorption as bamboo, making it less effective at distributing the forces exerted on the sword during use, which can lead to damage of the sword or the handle (tsuka).
Bamboo
Bamboo is the most suitable choice for mekugi. It is a strong, durable, and lightweight material that is easy to work with and offers a good balance between strength and flexibility. Its fibrous structure allows it to grip the inside of the sword's tang tightly, ensuring the blade stays securely attached to the handle. Additionally, bamboo does not rust, making it more durable in varying conditions compared to metal pegs. It is also a readily available and sustainable resource that is easy to obtain.
The best type of bamboo for is called "Madake" (真竹). which is cut around the winter solstice and then dried for three years. It's then soaked in plant oils like camellia or rapeseed oil to make it stronger before use.
Another high end type of bamboo is "Sustake" (煤竹). Sustake bamboo refers to bamboo that has turned black or brown after being exposed to smoke over a long time. It was used in old Japanese houses. The smoke from fires made soot particles stick to the bamboo, giving it a unique color and texture. In the past, houses often had hearths, and the smoke would go up to the straw roofs, creating Sustake bamboo. Some of this bamboo is over 200 years old, making it very expensive. Sustake is much tougher and more flexible than regular bamboo, perfect for making sword pegs.

Image source: taketora.co.jp
Other Material:
For actual use, we know bamboo is the best choice. But there are other material like horn and ivory, known for their premium appearance and resistance to deformation. These materials add a luxurious touch to the sword but are not as strong as bamboo, making them more suitable for decorative purposes or for use in Shirasaya, where they're less likely to be subjected to the stresses of combat.
Mekugi Size
Mekugi is usually 18 mm (0.7 inches) long, diameter is 5-7 mm (0.19 - 0.27 inches). Mekugi for shirasaya are made thinner, as these sheaths are often used for display or ceremonial purposes only, requiring less structural strength.
Do all katanas have Mekugi?
Yes, all real katana should have Mekugi. the Mekugi plays a crucial role in holding the Tsuka in place, without it you are going to battle with a loose sword. This is a live or die matter. If you can't find Mekugi in your katana, that means it was not intended for use.
As matter of fact, Mekugi often breaks during battles. Records show that during the Showa-era wars, the most common type of damage to Japanese swords was the breaking of these pegs. That's why samurai always carried extra Mekugi they made themselves in case of emergency. In modern days we no longer use katana for actual battle, so it's rare to see a broken Mekugi.
Here is a type 3 Gunto, using a metal collar to further secure the Mekugi:

How many Mekugi does a katana have?
In ancient Japan, we can seem some katanas feature a single Mekugi, but speak from actual using experience and historical practices, having two Mekugi in your katana is the best option. This is particularly true in scenarios where the sword is used extensively, as in martial arts practice or in the critical moments of battle, where the risk of a Mekugi breaking could compromise the sword's integrity, that might cost a life. The adoption of a second Mekugi provides a backup, reducing the risk of the blade becoming loose or detaching from the handle. We can see many swords from Sengoku period, have two mekugi in their nakago.
Our custom katana used 2 Mekugi, to maximize the sword safety.
How to remove and insert Mekugi
- Locate the Mekugi: Place the katana on a clean, flat surface. Identify the Mekugi on the handle. It should be easy to find, but sometimes it is covered by the ito wrapping, that will make remove process more difficult.
- Use the Proper Tool: Traditionally, you will need a tool called Mekuginuki ( 目釘抜き) to remove the Mekugi. It's basically a small brass hammer. If you don’t have a Mekuginuki (Very common for most people), a small, non-metallic tool like a strong bamboo skewer or a plastic pin can work too.
- Find the right end: Typically, one end of the mekugi is thicker, and the other end is thinner. When removing the mekugi, you pull it out from the thinner side. Sometimes, both ends may seem to be of the same thickness, but there's usually a slight difference in size, so in that case, lightly tap it to determine the correct direction to remove it.
- Gently Tap Out the Mekugi: Position the Mekuginuki or your tool against one end of the Mekugi. Gently tap on the tool with a small hammer or another suitable object to push the Mekugi out of its hole. Be careful to apply force evenly and gently to avoid bending or breaking the Mekugi.
- Remove the Mekugi Completely: Once the Mekugi is loosened, you can usually pull it out by hand. If it’s tight, gently wiggle it back and forth while pulling it out to avoid damaging the handle or the Mekugi itself.
*Avoid using the broken mekugi again, because it will not secure the sword.
Conclusion
Mekugi are small but essential components of Japanese swords that play a crucial role in holding the handle in place. If you are a new fanatic of the world of Japanese Katana but curious enough to dive into it, learning about the significance of the Mekugi can be a great start. Thanks for reading!


I have two katanas that I need replacement dowels for. I’m not sure of the exact diameter and may need assorted sizes to choose from.