


Katana Saya Complete guide to understand the sheath of the legendary samurai sword
The Saya: More Than a Scabbard for the Japanese Katana
The Katana, or samurai sword, is truly a lethal weapon. But to preserve its functionality and aesthetic appeal, the blade must be properly stored, that' why we need the scabbard (Saya). The scabbard is the most important part made to protect the sword and its surroundings from dirt and moisture. While the focus is often on the blade of the Japanese sword, the craftsmanship applied to the scabbard is also noteworthy. In this article, We'll explain the basics about saya, including their history, types, and how they are made.

Table of Content
- What Is Katana Saya (鞘)?
- Types of Saya (By functionality)
- Types of Saya (By design)
- Saya parts
- History of Saya
- How to Make a Saya
- Saya in modern days
- Importance Of The Saya In Martial Arts
What Is Katana Saya (鞘)?
The scabbard of a Katana is called Saya (鞘) in Japanese. It's a wooden cylindrical case that stores the blade. Saya serves multiple purposes: safeguarding the sharp edge, preventing the blade from rusting, and ensuring safety during both storage and transport. Traditional material for Saya are leather, wood, animal horn, fabric, and metal, in moderns days, synthetic materials were also used to lower the cost. The Japanese sword symbolizes status and power, we can see many saya are heavily decorated as well, to match the value of the blade.

Aside from that, the saya of the Katana plays an important role in Battōjutsu. In fact, this line of martial arts is centered around the technique of sheathing and unsheathing the sword.
Katana Saya Length and Weight
The length of a Saya can vary significantly depending on the size of the blade it is meant to house. Traditional Japanese katanas typically have blade lengths ranging from about 60 cm (23.6 inches) to 80 cm (31.5 inches), with some variations. Consequently, the saya, being slightly longer than the blade to ensure full coverage and protection, would measure about 62 cm (24.4 inches) to 82 cm (32.3 inches) or slightly more, depending on the specific blade length and the additional clearance allowed for safe insertion and removal of the blade.
The weight of a saya can also vary based on the materials used (wood, lacquer finishes, and decorative elements like ray skin or metal fittings), as well as its thickness and the craftsmanship involved in its creation. A lightweight saya might weigh around 300 grams (0.66 lbs), heavily decorated saya can weight more than 500 grams (1.1 lbs)
Material for Saya

Photo: 朴の木 "Hō no Ki" from katanatansu.jp
The main material for saya is wood, it constructs the body of the saya. in ancient Japan, they often used cedar and cypress wood. but from the Heian period onwards, magnolia wood (known as 朴の木 "Hō no Ki" in Japanese) became the preferred choice. Magnolia wood's moderate softness makes it easy to work with, offering the right balance of strength and gentleness to protect the blade without damaging it. This wood is also well-suited to prevent moisture intrusion, making it ideal for saya construction.
Ideal magnolia wood comes from colder regions, such as Nagano's Kiso area or Fukushima's Aizu region, known for producing wood with the appropriate softness. The process of drying the magnolia wood, essential for preparing the saya, can take anywhere from six months to ten years, with natural drying being preferred to preserve the wood's integrity and appearance.

Photo: Sayashi Source: city.setouchi.lg.jp
In addition to wood, other materials like ray skin and various metals are used for decorative and functional purposes, creating the ornate designs. The craftsmen, known as "saya-shi 鞘師," who combine traditional techniques with a deep understanding of different materials to create saya that are both protective and beautiful.
Types of Saya (By functionality)
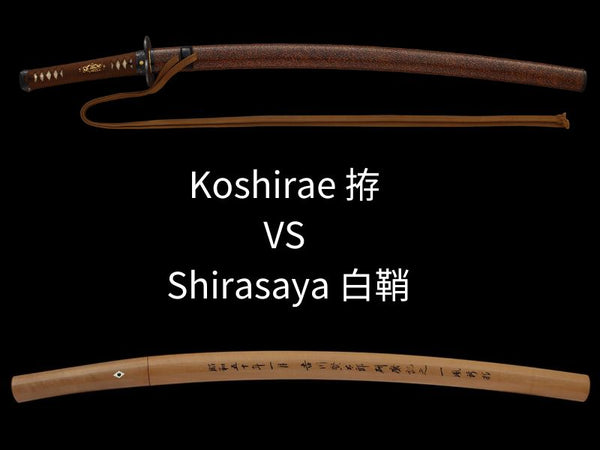
There are two main types of Saya, Saya for the "Koshirae 拵",used for carrying the katana around. And Saya for the "Shirasaya 白鞘" used for storage. Before you get all confused, you should know that Koshirae in Japanese refers to all the external mountings of a katana sword, that means technically speaking, Saya is a part of Koshirae.
Saya for Koshirae 拵

The Koshirae refers to the complete ensemble that decorates the sword blade, including the saya, tsuka, and tsuba etc. Koshirae is intended for carrying the sword around, it should made to be more sturdy, high quality saya for koshirae often use magnolia wood that has been dried for over ten years.
Saya for koshirae often painted with lacquer over a wooden base and decorated with metal fittings. In the case of a Tachi, it has additional fittings that allow it to be hung from a belt. For Uchigatana saya, they have special designs to store small tools like Kozuka (tiny utility knife) and Kogai (hair pin).
The Koshirae is essentially the sword's "outfit" for when it's carried around. They are often decorated beautifully, reflects the status and wealth of its owner. Other than high quality wood and lacquer, precious metal like Gold, Silver are used for small details that add a fancy touch, some designs are wrapped in an entire ray skin to provide unique look.
Saya for Shirasaya 白鞘

Image source: wikipedia
The Shirasaya refers to a scabbard that is simply finished in plain wood, without a guard or other decorative parts. Surprisingly, leaving the blade in the Koshirae can cause the sword to rust due to ventilation issues. Since the Koshirae is for carrying around and mainly serves for decoration, it's not suitable for storing the sword for long time. The Shirasaya, literally means "white scabbard", is a scabbard specifically made for storing the blade.
Shirasaya allows the blade to "rest" due to its untreated, breathable surface. That's why it's also called "Saya for resting" ("休め鞘" ) during Edo period. Because Shirasaya keeps its natural wooden state, the humidity inside the scabbard is maintained, reducing the chance of the sword rusting.
Shirasaya can easily be split open, allowing for easy cleaning and maintenance of the inside. And after cleaning, simply use sticky rice (続飯) to glue them together again. Also, the handle is designed to be easily removable. As you can already tell, Shirasaya is not designed for actual using, cutting with shirasaya might cause severe injury.
鞘書 Saya-gaki in Shirasaya
"Saya-gaki" means the writing on a "Shirasaya," in ancient Japan, Daimyo wrote this info to keep track of their swords. Big families had many swords, including ones passed down through generations, rewards, and gifts. Sayagaki records the sword maker's name, blade length, and the date it was written, who gave the sword to them etc, all in black ink.
Over time, as the samurai era ended, the purpose of saya-gaki changed. It went from being an index to keep track of swords to a mark of authenticity, and instead of Daimyo, Saya-gaki is now written by professional sword appraisers.
Types of Saya (By design)
Other than functionality (koshirae and shirasaya), we can also classify Saya types based on their design and decorations:
平鞘 Hirazaya
A "Hirazaya" (平鞘) is a slim, flat cover for swords, made by carving wood to match the sword's blade. It was also used for "Kenuki-gata Tachi" (毛抜形太刀) and "Efu no Tachi" (衛府太刀) from the Heian period, worn by warriors. These swords in Hirazaya are called "Hirazaya Tachi" (平鞘太刀).
丸鞘 Maruzaya

Image source: wakayamacity-bunkazai.jp
A "Maruzaya" (丸鞘) looks like an upside-down egg, thicker where it holds the sword's spine and thinner for the blade. It was made for thicker swords. Initially, Hirazaya were for battle swords, and Maruzaya for ceremonial ones. But from the Muromachi to Edo periods, Maruzaya became common for battle swords too.
塗鞘 Nurizaya

Image source: wikimedia.org
A "Nurizaya" (塗鞘) is a scabbard that has been lacquered. The process of lacquering a scabbard involves applying lacquer, letting it dry, and then polishing it, repeating these steps multiple times.
The lacquering is done by a craftsman known as "Nushi" or "Nurishi" (塗師), and it varies depending on the craftsman. The process starts with applying raw lacquer to solidify the base, followed by applying an undercoat, then a layer of black lacquer or other colors, and finally, a top coat to complete the Nurizaya.
Nurizaya can further segment into the following types based on their design:
- Roiro-nuri (蝋色塗, Wax Color Coating): Glossy, mirror-like finish.
- Ishime-nuri (石目塗, Stone Texture Coating): Stone-like texture with a calm appearance.
- Shuiro Urushi-nuri (朱色漆塗, Vermilion Lacquer Coating): Bright vermilion color with a glossy surface.
- Maki-e-nuri (蒔絵塗, Sprinkled Picture Coating): Decorative technique where patterns are drawn with lacquer and set with colored powders.
- Kin Nashiji Taka-maki-e-nuri (金梨子地高蒔絵塗, Gold Pear Ground High Maki-e Coating): Uses gold powder for high decorative quality.
- Raden (螺鈿, Mother-of-Pearl Inlay): Patterns made with shell pieces fixed in lacquer.
-
Kawari-nuri (変り塗, Varied Coating): Various specialized techniques, including:
- Aogai-nuri (青貝塗, Blue Shell Coating): Mixing shell or gold powder into the lacquer.
- Nashiji-nuri (梨子地塗, Pear Ground Coating): A technique that mixes materials into the lacquer for texture.
- Hiramaki-nuri (蛭巻塗, Leech Wrap Coating): Patterns created with lacquer alone, such as spiral designs.
- Aogai Mijin-nuri (青貝微塵塗, Finely Crushed Blue Shell Coating): A decorative technique using finely crushed blue shell (Aogai) embedded in lacquer, known for its bluish iridescence.
- Ikekaji-nuri (沃懸地塗, Moisture Suspended Ground Coating): A gold sprinkling technique on sword fittings, sometimes enhanced with mother-of-pearl for "Ikekaji-nuri Raden" or thin metal pieces for "Ikekaji-nuri Hirabun".
着せ鞘 Kisezaya

Photo: Samegawa Kisezaya image from seiyudo.com
"Kisezaya" (着せ鞘) refers to a scabbard that is wrapped with decorative materials, usually ray skin or animal leather:
-
Samegawa Kisezaya (鮫皮着鞘, Ray Skin Dressed Scabbard): Commonly uses ray skin, known for its rough surface.
-
Kairagi Samegawa Kisezaya (梅花皮鮫皮着鞘, Plum Blossom Pattern Ray Skin Dressed Scabbard): Features a plum blossom pattern that emerges after polishing the ray skin.
-
Ajiro Tsutsumi Saya (網代包鞘, Net Wrap Scabbard): Wrapped with fishing nets.
-
Rankaku Tsutsumi Saya (卵殻包鞘, Eggshell Wrap Scabbard): Covered with eggshell for decoration.
刻鞘 Kizamizaya

Photo: Kizamizaya image from seiyudo.com
"Kizamizaya" (刻鞘) means a scabbard that has carvings for decoration.These carvings can vary in width and pattern, leading to different designs. For example, there's "Naname Kizamizaya" (斜刻鞘), which has diagonal carvings, and "Inro Kizamizaya" (印籠刻鞘), which looks like it has a series of small, connected boxes or inro (traditional Japanese case for holding small objects) carved into it.
Saya parts
As we mentioned earlier, there are 2 types of Saya based on their functionality, Koshirae for carrying and shirasaya for storage. To dig deeper in this topic, koshirae for tachi and Uchigatana has their own unique parts as well:
Saya Parts (For Tachi koshirae)
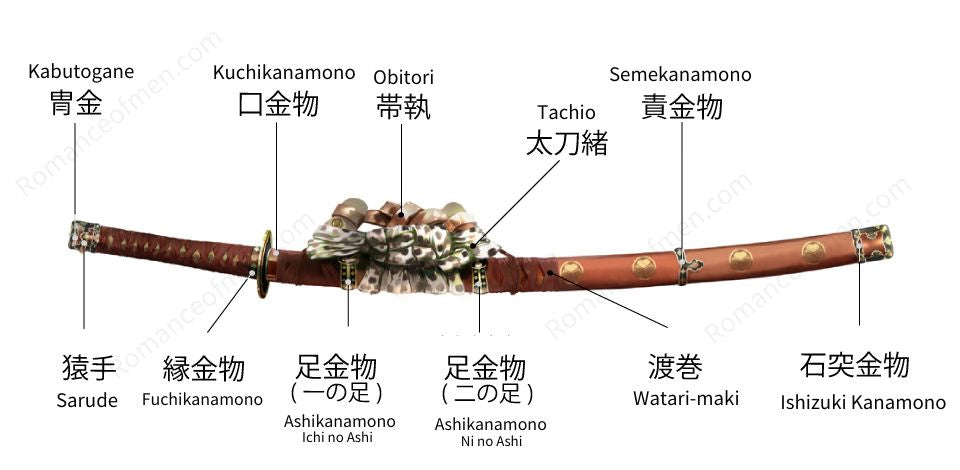
Ashi-kana-mono (足金物, First and Second Ashi)
Ashi-kana-mono consists of metal attachments which allow the Obidome (帯留) to pass through, facilitating the hanging of the Tachi (太刀). These fittings are situated right beneath the tsuba (鍔), with the first one positioned slightly below it, and the second one even lower. The first ashi (一の足) is closer to the scabbard’s opening, while the second ashi (二の足) is further down.
Obidori (帯執)
The Obidori is an ornamental element, often made of leather, that is used to thread the cord of the Tachi through. It is closely associated with the Ashi-kana-mono.
Tachi-o (太刀緒)
The Tachi-o is either a braided or leather cord that helps in fastening the sheath. It is wrapped around the waist when the Tachi is worn and typically has a tortoiseshell pattern. The cord is approximately 3 meters in length and, when the sword is not in use, it is tied in a particular knot called Tachi-musubi (太刀結び).
Seme-kana-mono (締金物)
Seme-kana-mono is a metal ring-shaped attachment fixed to the scabbard’s midsection to keep it from cracking open. Often, a Kashiwaba-kana-mono (柏葉金物), which has a design that mimics oak leaves, is utilized for this purpose.
This term describes the flat wrapping found on the top third of a Tachi's scabbard (approximately 30cm), using the same material as the sword's handle wrap. It serves as protection from wear, especially when the sword is worn alongside armor.
Ishizuki-kana-mono is an attachment fixed to shield the base of the sheath.
Saya Parts (For Uchigatana koshirae)
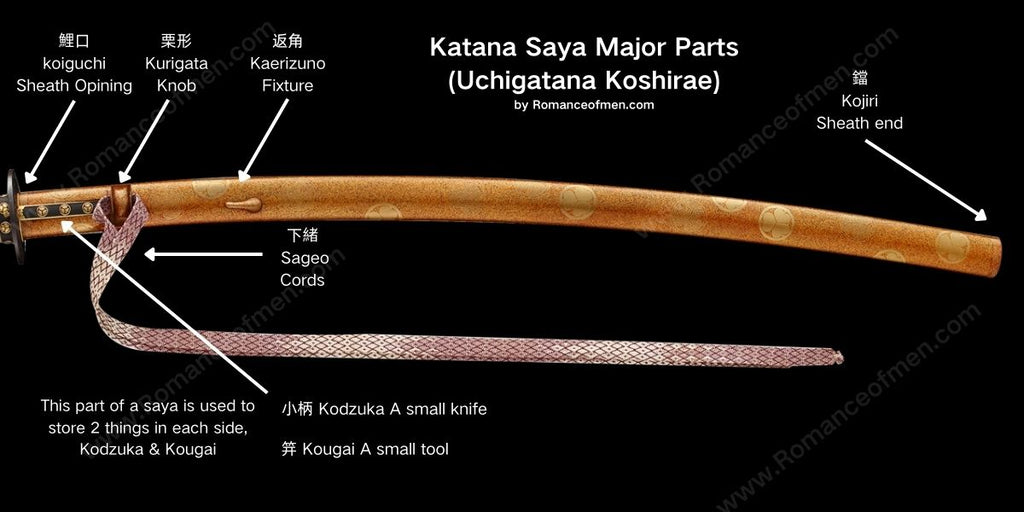
The koiguchi is the mouth or opening of the saya (scabbard) where the sword blade enters. It's often reinforced to ensure a snug fit and prevent damage to the saya and the blade.
Kurigata (栗形)
Kurigata is a knob or loop attached to the side of the saya. It serves as an anchor point for the sageo (cord), allowing the sword to be tied to the wearer's belt.
Kaerizuno (返角)
Kaerizuno is a metal fixture often found on the saya, near the kurigata. It's designed to prevent the sageo from slipping, ensuring the sword stays securely in place when worn.
Kojiri (鐺)
Kojiri is the end cap or tip of the saya. It protects the very end of the scabbard from damage and can be elaborately decorated to match the overall aesthetic of the sword fittings.
Sageo (下緒)
Sageo is the cord that threads through the kurigata of the saya. It's used to secure the sword to the wearer's belt or obi. Sageo comes in various colors and materials, often chosen to complement the sword's fittings and the wearer's attire.
Kougai-bitsu (笄櫃孔) and Kougai (笄)
Kogai-bitsu is a slot located on the sheath's outer surface made to accommodate the Kogai. The Kogai itself is a small, slender instrument utilized for grooming purposes, such as arranging untidy hair.
Kozuka-bitsu (小柄櫃) and Kozuka (小柄)
Kozuka-bitsu is a slot located on the reverse side of the sheath to store the Kozuka. Kozuka is a small, handy knife primarily used for carving wood or cutting paper. During the Edo period, Kogai-bitsu, Kogai, Kozuka-bitsu, and Kozuka evolved into highly valued ornamental pieces rather than just practical tools.
Don't get lost! In our custom katana section, we offer wide range of saya for your selection.
History of Saya

Photo: Unearthed ancient Japanese swords from nikkeibp.co.jp
The Beginnings in the Yayoi Period
The history of Japanese katana and the Saya can trace back to Yayoi period. Early saya unearthed from archaeological sites were not just functional, they were made with decorative materials like jade and red lacquer, as if they were being created as symbols of the owner's power. The main materials used included wood, and some seems like were made with animal skins.
Evolution in the Kofun Period
As we moved into the Kofun period, the variety of saya expanded. Alongside wooden saya, craftsmen began to incorporate deer antlers and even use metal extensively in their construction, gold and silver were often used as decoration. This period marked an era of innovation in saya materials and designs, reflecting the evolving craftsmanship.
Decorative Flourish in the Nara Period
By the Nara period, the artistic value of saya became more Important. Wooden saya with metal fittings became popular, indicating an increased emphasis on aesthetic appeal. We can now find Tang-style sword with gold and silver inlay, featuring white ray skin-wrapped handles, and exquisitely detailed gold fittings. These features are considered the prototypes for later decorative katana.
Refinement in the Heian Period and Beyond
With the advent of the Tachi during the Heian period and the Uchigatana (打刀) in the late Muromachi period, the design of saya underwent significant refinement. These swords featured a distinctive curve, and saya were crafted to match this curvature precisely. The interior of the saya was designed to ensure it did not touch the sword blade, a testament to the advanced techniques developed to tailor each saya to its katana.
We can also found some saya for practical uses. Unlike decorative saya, practical saya were usually made by covering the wood of the scabbard with thin leather and then coating it with black lacquer. They used simple, practical metal fittings and had very little decoration. They were use on battle and rarely survived til today for us to see. The very rare ones we can see today are still of much higher quality than the standard saya for ordinary soldiers
How to Make a Saya
The Japanese sword involves various craftsmen in its production, each focus on their own area perfecting their skills. There are specific craftsmen, known as "Saya-shi", who make the best scabbard to fit each sword. As previously explained, there are 2 types of saya, "Koshirae" and "Shirasaya", but the manufacturing process is almost the same until a certain point. Here, we will introduce the materials for the Saya and the Saya-shi's job, the manufacturing process.
Shirasaya Making Steps:
1-Selecting and Shaping the Material (Wood Taking)
The Saya-shi chooses from Magnolia wood that's been naturally dried for more than 10 years. They check the grain and select the one that's easiest to work with and has the most beautiful texture. They then place the blade on the chosen wood, mark the shape, cut it out with a saw, making it larger than the blade shape, and use it as scabbard material.
2-Hollowing out the Wood (Carving)
The scabbard material is split straight into two halves, and the shape of the sword is drawn on the inside. Using various chisels, the material is carved out. The curve and tip of each sword are different, so they carefully customize and carve it out. Once a certain amount of carving is done, they apply oil to the blade, put it into the scabbard, and check where the blade touches the scabbard by the oil marks. If the blade touches the scabbard, it could rust at that point. They keep making fine adjustments to carve it out so that the blade doesn't touch the inside of the scabbard, but the inside of the scabbard doesn't become too wide either.
3-Joining the Wood (Gluing)
Once the blade fits nicely, the two parts of the saya material are glued together. The adhesive used for this is called "Tsugui", which is a paste made from rice grains. Because it's not a chemical, it doesn't affect the blade, and although it has adhesive power, it's not too strong, so you can peel it off without damaging the scabbard if a certain amount of force is applied.
4-Shaving and Polishing the Wood (Shaving, Polishing)
The outside of the glued scabbard material is planed. They create the part where the handle and scabbard join, drill a hole in the handle for a peg to fix the tang (Nakago), and chamfer the finish. The outside is then polished smooth using Horsetail or Aphananthe leaves, and the Shirasaya is complete.
Koshirae Saya Making Steps:
The Koshirae is essentially the "dressed up" version of the Shirasaya. It has lacquer applied and fittings attached. The Koshirae is made thinner than the Shirasaya to account for the thickness of the lacquer. It also has compartments for a small handle and hairpin, for which individual holes ("hitsuana") are carved.
After the saya is crafted to serve as the base for the Koshirae (the Koshirae shitaji), it is handed off to various craftsmen for further detailing. A "nushi" applies the lacquer, a "tsukamakishi" decorates the handle, and a "kinkoshi" works on the ornamental metal parts. The extent of each artisan's work can vary.
Lacquer the Scabbard
When you think of a Japanese katana saya, the first thing that often comes to mind is a saya with black lacquer. Lacquering is a traditional Japanese technique applied to various wooden products. The lacquer applied to the saya is referred to as "kawarimono", and there were artisans specialized in applying lacquer to scabbards. The base of the Koshirae is painted with various colors of lacquer, not limited to black, and different patterns are created by applying lacquer with rayskin, leaves, stencils, and so on. These patterns add decoration to the saya.
Handcrafted and lacquered Kata Saya carry great art value. A traditional Japanese scabbard lacquerer spends two to three months on a single saya to craft it to perfection. This is why handcrafted Katana Saya can cost more than a thousand dollars.
The exterior of the saya should have a certain degree of roughness to hold onto the lacquer. To achieve this, the craftsman uses washi paper and a clay mixture to lay down a foundation for the layering. A special polishing powder, known as Tonoko, goes into the clay mixture.
The next process is Naka Nuri. During this phase, the lacquerer sand down the exterior of the sheath, making it rough. He will then apply a lacquer layer of a previously agreed-upon color. Usually, the artist will mix dye powders with lacquer to prepare the desired coating.
That first layer is allowed to dry. Afterward, the lacquerer shall sand down the layer with a piece of sanding charcoal. This again makes it rough and ready to apply another lacquering layer. The craftsman shall repeat this sanding and layering a total of ten times.
The purpose of lacquering the saya is not just artistic. Instead, it is mostly a protective measure. The lacquer coating makes it difficult for the environmental forces to penetrate the saya and reach the blade. Thus, the lacquering process enhances the longevity of the Katana and the saya.
Saya in modern days
Modern Saya Production
As mentioned, traditional katana saya are ideally made from magnolia wood that's been dried for years. However, due to the high cost, this isn't feasible for mass-produced katanas. Nowadays, since we don't use katanas for battle, we don't require such high-quality wood for every saya.
For mass production saya, more affordable woods are used, and various methods are employed to ensure the saya is of decent quality for everyday use. One common technique involves soaking the saya in wax to prevent moisture absorption and reduce swelling.
Modern Saya common problems
Before mass-produced saya are shipped, usually the sellers will check them carefully to ensure they fit the katana properly. However, due to temperature changes and other factors during shipping, they might arrive too loose or too tight.
A frequent issue with mass-produced saya is with the koiguchi part which might deform slightly due to temperature changes or other factores, causing it not to fit the blade correctly—sometimes too loosely, sometimes too tightly. Fortunately, these issues can be fixed.
How to fix Saya that's too tight?
You might feel frustrated when you received a katana with over tight saya. If the saya is too tight, that means you can't even draw the katana out properly. it's not just a matter of inconvenience, it can actually cause damage if you need to force the way out.
The solution to this problem is very straight forward and simply, you just need to file the inside of the koiguchi. Look for marks on the Habaki to find the tightest part, file it lightly for a couple of times, sheath and unsheath the see how it fits. Repeat the process a until you find the perfect fit for your katana.
Even you don't want to file the saya, after you use it for a while, at some point, the saya will become loose anyways. Katana was designed for actual use, some parts get wear and tear is totally normal.
How to fix Saya that's too loose?
As mentioned earlier, the Saya will inevitably become loose over time with each use. To fix a loose saya the method is the opposite of fixing a tight saya, that is make the part near koiguchi thicker, so it will contact the habaki closer and hold the sword tight.
Our recommendation is to use shims. You can make shims from thin pieces of wood, or buy them from home improvement store or lumber yard, glue them into the koiguchi. Try to sheath and unsheath the sword a couple times to adjust the tightness.
Importance Of The Saya In Martial Arts
The term Battōjutsu means the art of technique of drawing the blade. The later version of Battōjutsu is Laidō, which means the martial art of quick drawing and resheathing the sword. So, it’s easily understandable how crucial the scabbard is in the Japanese sword-wielding martial arts forms.
To the less knowledgeable public, the saya, or scabbard, might seem like a mere covering for the Katana. However, as you learn more about Battōjustsu and Iaidō, you will see that the saya is as important as the sword in these martial arts.
In fact, training in these disciplines mostly focuses on the skillful sheathing and unsheathing of the Katana. So, it is not an understatement to say that Battōjutsu and Iaidō don’t exist without the Saya.
The role of the saya is very important during a fight. If you are normally waving or swinging a blade, you won’t be able to use its full striking potential. However, you can strike your opponent with the most power when you draw it from the Saya and wield it. This is why Battōjutsu puts so much emphasis on training the sheathing and unsheathing of the Katana.
When you draw the Katana out of the scabbard, it moves three or two times faster than it would normally. That’s because unsheathing gives the samurai the advantage of putting more power into the movement without worrying about controlling the pathway. As the Katana curves upwards against the Saya, it can guide the blade when the fighter draws it out.
In other words, the saya is not just a covering but actually a part of the Katana. Suppose two samurai with the same level of expertise engage in a battle, and one doesn’t have the saya. In this case, you can bet that the person with the sheath will more likely to win.
Conclusion
The Katana Saya is a work of art. The intense labor the craftsman puts into manufacturing and lacquering the piece speaks of dedication and excellence. At the same time, it is a crucial piece of equipment during samurai training and battle. We hope this article will help you better understand the Katana saya. For more katana parts knowledge you can check here.


